Editing your profile
If you have a profile on the School of Earth Sciences' "People" directory, you can log in and edit the content on your page. If you have trouble editing your profile, contact ses-comms@osu.edu. Don't forget to save your changes using the blue "Save" button at the bottom of the "Edit" page!
Below, you'll find a video tutorial and written instructions.
1.0 Log in
Go to the bottom right of any page on the website and click on the white “LOGIN” link. This should bring you to your user profile by default. Above your name, you should see new "View" and "Edit" links.
2.0 Edit your profile
Choosing "Edit" will take you to the editor interface for your page. Here, you can modify:
- Name
- Pronouns
- Photo (if NOT using OPIC)
- Bio
- Professional information
- Contact information
3.0 Managing your photo
We recommend using OPIC to manage your photo. This allows your image to be re-used across all University services and websites that link to OPIC services, so you do not have to keep re-uploading it every time. A good example might be a faculty member with a profile on the School of Earth Sciences and the Byrd Polar and Climate Research Center websites. This faculty member would only need to update their photo on OPIC to have the change show across both sites.
3.1 Using OPIC
To use OPIC, visit that site, log in with your Ohio State name.# and password, and upload your image. If you have the "Use OPIC" box checked, your profile will display your OPIC photo. Note: If you are not a student, staff member, or faculty member in SES, use the username and password assigned to you.

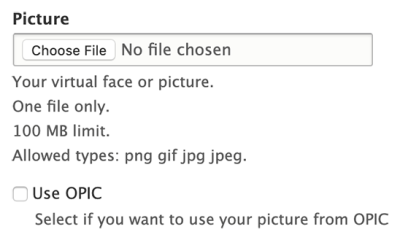
3.2 Using the image override
For users who prefer not to use OPIC, an image override function is located just above the Use OPIC box. To use this, follow the steps below.
- Uncheck the "Use OPIC" box.
- Have a 600×800 image ready to upload.
- Click "Choose File" to upload your image.
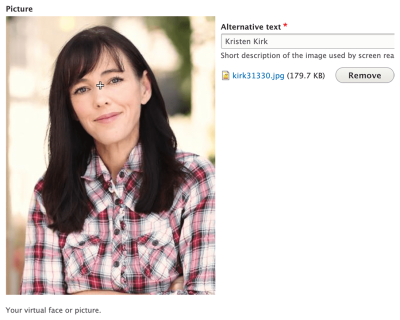
- Once it’s on the website, fill in only your full name in the "Alternative Text" field that appears. This helps screen reading software recognize that the image is you! This is important for accessibility compliance.
- In the center of your image, you'll see a white plus sign. This symbol represents the focus point of the image. The focus point determines where the crop happens on the main directory page. To make sure your face is always the focus of your picture, place the focus point directly in the center of your face.
4.0 Updating your bio
Here, you can summarize yourself and what you do in the department. We encourage people to use this as a high-level overview of themselves, NOT as a personal website. If you want to create a personal website, you can use the free U.OSU web platform.
Many of the "Bio" functions are similar to Microsoft Word programs. You can bold, italicize, bullet-point, align text, etc. However, there are a few considerations for accessibility regarding links and headings to keep in mind.
4.1 Links
4.1.1 Adding internal links (a page within the School of Earth Sciences website)
- Highlight the word(s) you'd like to use as a link.
- Select the link icon.
- Type the title or a keyword of the internal page.
- A dropdown box will show all pages containing that title/keywords.
- Select the page you'd like from the dropdown.
- Select "Save".
4.1.2 Adding external links
- Highlight the word(s) you'd like to use as a link.
- Select the link icon.
- Paste the external URL.
- Select "Save".
4.1.3 Adding email links
- Highlight the text you want to use as the link.
- Click on the link icon.
- Type "mailto:" in the field and then type or paste the email address.
- Add a descriptive text (e.g., "Email the School of Earth Sciences front desk").
- Click "Save."
4.2 Headings
Proper heading structure is vital for accessibility, as it helps sighted users and those using screen reading software navigate the content effectively.
The title of the page is considered Heading 1. To provide a heading for a section within your page, select the "Paragraph Format" dropdown menu (located in between the "Media Entity Embed" icon and the "Styles" dropdown). Use Heading 2 as your section title. For subsections of Heading 2, use Heading 3. For subsections of Heading 3, use Heading 4, and so on up to Heading 6.
Even if you think it might look more appealing to create your own system of headings, it's very important to follow the correct heading hierarchy. This is because headings that are not in the correct order will cause screenreading software to skip around to different sections of your page. This causes accessibility and legal issues.
4.3 Adding images
- Place your cursor where you want the image to appear.
- Click on the "Media Entity Embed" icon.
- Select an image from the gallery or upload a new image, and be sure to add alternative text to any new images.
- Choose the display width as a percentage of the page width.
- To wrap text around the image, choose an alignment.
- Click "Embed."
4.4 Adding files
- Start by adding a new line where you want the file to appear.
- Click on the media icon.
- Select the "Upload Files" tab.
- Choose to upload a new file.
- Add a name for the document (e.g., "Example Document [PDF]").
- Choose "Display As" as "File Embed" and click "Embed."
5.0 Professional information
This section houses multiple fields for you to enter items like job titles and education. Make sure you use the full URL when adding social media like Twitter. Just using your @username will not generate a link to your account.
6.0 Contact information
This section houses information such as phone numbers and office information. The "Street Address" field generates a Google Map on your profile. If you'd like to disable the map, select "Hide Google Map".